Thursday, February 2, 2017

Renovation Part Two

On the first day the ceiling all came down pretty easily, revealing the joists and giving me a bit of an idea where most of the water seems to be coming in from. It's hard because it's just a small amount of water, and it only occurs during our norwest storm cycles each winter, so it's probably a combination of wind and Venturi effect from cracks in the fibre cement under the tiles. I'm hoping that judicious application of Sikaflex works.


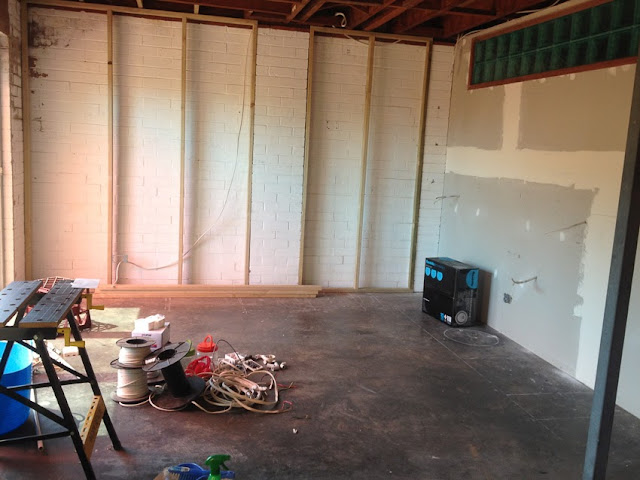
Some of the stud walls got installed on the first day. If the brick walls were all double brick it wouldn't need gyprocking, but it's a mishmash of double brick pillars and single brick walls in between, so all walls except the front wall will be clad with plaster board. It means I can hide the wiring, which until now has been exposed.


A little setback however, when we discovered that the ceiling joists are not all the same height. The joists over the verandah above are a little lower, so we need to batten the entire area to get an even ceiling. Sigh....


At the end of Day 1 the skip bin arrived, so I flexed some muscle and threw all the old ceiling, plus lots of my accumulated junk into it. I've told the builders I'm paying them to do work I'd struggle with, whereas cleaning up and throwing garbage in the skip bin is something I can easily do myself.

With the ceiling off the wiring can get laid, but there's a bit of a chicken and egg scenario between the electrician and the builder over what needs to be done before the other can do their bit. Because the ceiling needs to be rebattened the lighting can't be laid yet. Aside from that, by the end of Day 3 most of the wiring is in.


And the walls were all studded, the insulation installed and the main walls gyprocked.


With the ceiling off we could see that there was a bit of a sag going on, with the weight of the floor above probably not being supported adequately by the beams and the single post supporting it. This sag may also have contributed to the water pooling. The post isn't actually in a central position, and is frankly in a very annoying place as regards where the new kitchen layout will be, so we are moving it and supporting the weight above better by installing a steel bulkhead. This will probably make the house more structurally sound, and maybe sort the water issue as well.


Meanwhile, I've been doing my own DIY repairs. I've repointed the bricks on one of the pillars, applied Sikaflex the entire length of the verandah, and replaced the wire screens on all the insect screens in the rest of the house. Removing old spline is a right royal pain in the arse, but the new screens are worth the effort. Hopefully they will last another 30-40 years!!

Needless to say I'm not going skiing in the northern hemisphere this year....

Wednesday, February 1, 2017

Creating my crash pad - renovating the garage

I spent most of last year away travelling and like most other years, I got house sitters to look after my house and garden whilst I was away. But this time I was away, on and off, for 9 months, and it was just too much time to have someone in my house, using my stuff and taking advantage of free rent. It was time to get serious about preparing my house for paying tenants, and clearing out years of detritus. Especially as I intend to be spending more and more time away in the next few years.

So rather than pack my personal stuff into storage and sell the rest of my belongings, I decided to renovate my disused double garage into a self contained flat in which I'll live when I'm home, and then rent out the rest of the house to a longer term tenant.

This process began many years ago when I removed the double roller doors and had large bifold doors installed in my double garage. Mostly because my car, a Toyota Landcruiser Troopcarrier, is too high to fit inside the garage. And then I built a garden in front of it. So a long long time ago it ceased to be a house for cars and became a quasi living space. It mostly got used, like most garages, as storage space for toys, in my case bikes, scuba and windsurfing gear, as well as a video editing space, mini office, and garden/tool storage.


A year ago a friend helped with the next stage, which was to build a room that could be secured, that I could store stuff in, lock up, and then I could rent out the rest of the house. This room would, at a later stage, become a bathroom for a self contained flat. At some indeterminate future date.


It turns out this future date is now. So my first project for 2017 is project managing a home renovation.

I was going to write just one post, but have decided to split it up into a number of posts.

Early in the new year the plumbers came and installed the waste outlets. This required punching through the cement slab and brick wall, but the way I've designed my bathroom and kitchen, I've kept the plumbing required to a minimum.


Then, in order for the rest of the work to commence, I had to get rid of all the junk that had accumulated in the garage!!

I am a dreadful hoarder, and to be fair, I do a pretty good job of reusing a lot of the stuff I hold onto. However I am being a little more ruthless this time, filling up the garbage bin, holding a garage sale and selling stuff via Facebook sale pages and Gumtree. Plus moving everything else out of the space to store it elsewhere in my house prior to demolition work beginning. OMG I've got a lot of stuff!!


The ceiling needed removing in order for the electrician to rewire, and besides that it's been water damaged from water seeping in from cracks in the upstairs verandah.


I had a bit of a scare when my builder informed me that he thought the ceiling might have asbestos in it. This is a big issue in WA when renovating houses built before 1980 because pretty well all the fibre cement products used in building materials contained asbestos. Luckily for me it looks like the ceiling was put in later, and is asbestos fibre free. Huge sigh of relief as that's one less extra cost!

So the initial plumbing work happened early in the New Year, but it wasn't until late January when the next work began.

That's next...